(by the way, if you want to see any of the photos on this site enlarged, just click on them)
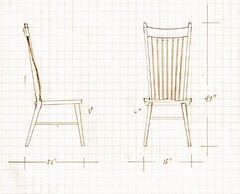
When I design and create a custom piece of furniture such as this dining chair, I have several steps. After initial concept sketches, I draw the piece to scale. My second step is to use the scaled drawing to make a prototype — or full-scale model — of the chair. With the prototype I can test-drive the piece to make sure it is comfortable, sized correctly and most importantly, to refine the lines and forms of the design. The third step is building the actual chair. I guess there is a fourth step: making sure my customers are satisfied!
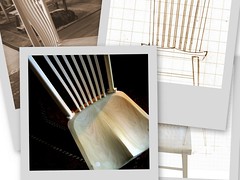
The photo above is the first version of the prototype for an armless dining chair. After contemplating the model for a day, taking it home and letting Maureen sit in it and give me her opinion, I decided to make a few changes to the chair. I change the prototype to make sure I am 100% satisfied before gluing up and cutting the walnut and curly maple I will use for the final piece.
As you can see, the prototype is very rough — for instance, the joints are not faired the way they will be in the final chair. I don’t use glue for the prototype – the joints are mechanical or fitted with screws. This makes it easy for me to take the model apart to make adjustments.
Although I was planning to fair out the chair legs anyway, I noticed from the prototype that I wanted to make the legs and seat of the chair more graceful, slightly more curved and rounded out than I had originally drawn in my sketch. I also immediately knew that I wanted the crest rail to have a more pronounced curve and that the balance between the hard lines and soft lines of the chair needed some tweaking. The joints of a prototype are extremely rough — I leave extra wood at the joints on the model. But having this new design sitting in front of me — in three dimensions made it a lot easier for me to see where I needed to make the transition points between hard and soft, and around the joints, have a more graceful flow.
All of the changes I thought of making after seeing and trying out the prototype are subtle changes, but it’s those subtle, almost invisible qualities of a piece of custom furniture that make the difference between a hohum or unattractive piece and a piece that really has soul, a beautiful well-crafted piece of furniture.
I make prototypes whenever I am working on a piece of furniture that’s totally new to me. The extra time it takes me to build a full size model is well worth it in the end results.
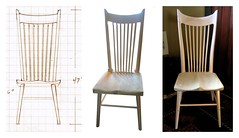 This (photo above) is the first go-round of refinements to the chair model. I’ll post more pictures of our refinements, and the finished chair as the work progresses. Thanks for stopping by my website and we’d sure appreciate it if you want to leave a comment, feedback, or ask any questions.
(my editor insisted on putting this pile in, just for fun.)
More views of the refined prototype: